Good morning.
It’s national-collective-civic-duty day in Kenya a.k.a. Election Day.
Whether you’ve either cast your vote already or are preparing to do so in the course of the day, let’s sweep away all the non-performers and install credible and dependable leaders.
Today’s #MTS has nothing to do with the election, but of course I’d have loved to come up with a good pun. Who wouldn’t?!

my first attempt at ‘show-me-your-hands’
So, I’ve had a few guys ask how this image came together without the ‘bodies’ being seen and I wanted to share a few screenshots of the steps to take to achieve similar results.
There are 10 easy steps to it, so, here goes;
1. Have the shot figured out in your mind. It all starts with the idea in your head first.
2. Choose a good location with a clearly defined base subject – in this case, a tree. Unlike the photo below, the less less clutter you have in the background, the better.
Why? The foreground elements will stand out even more.
![MTS04 - PP Screenshot [Base]](https://static.wixstatic.com/media/1aed06_88eb8e2176fc4ba3a045791b523a4227~mv2.jpg/v1/fill/w_980,h_1307,al_c,q_85,usm_0.66_1.00_0.01,enc_auto/1aed06_88eb8e2176fc4ba3a045791b523a4227~mv2.jpg)
main/base image for the composition
3. Set up your camera on a tripod and frame your composition. The camera should not move during the shoot sequence.
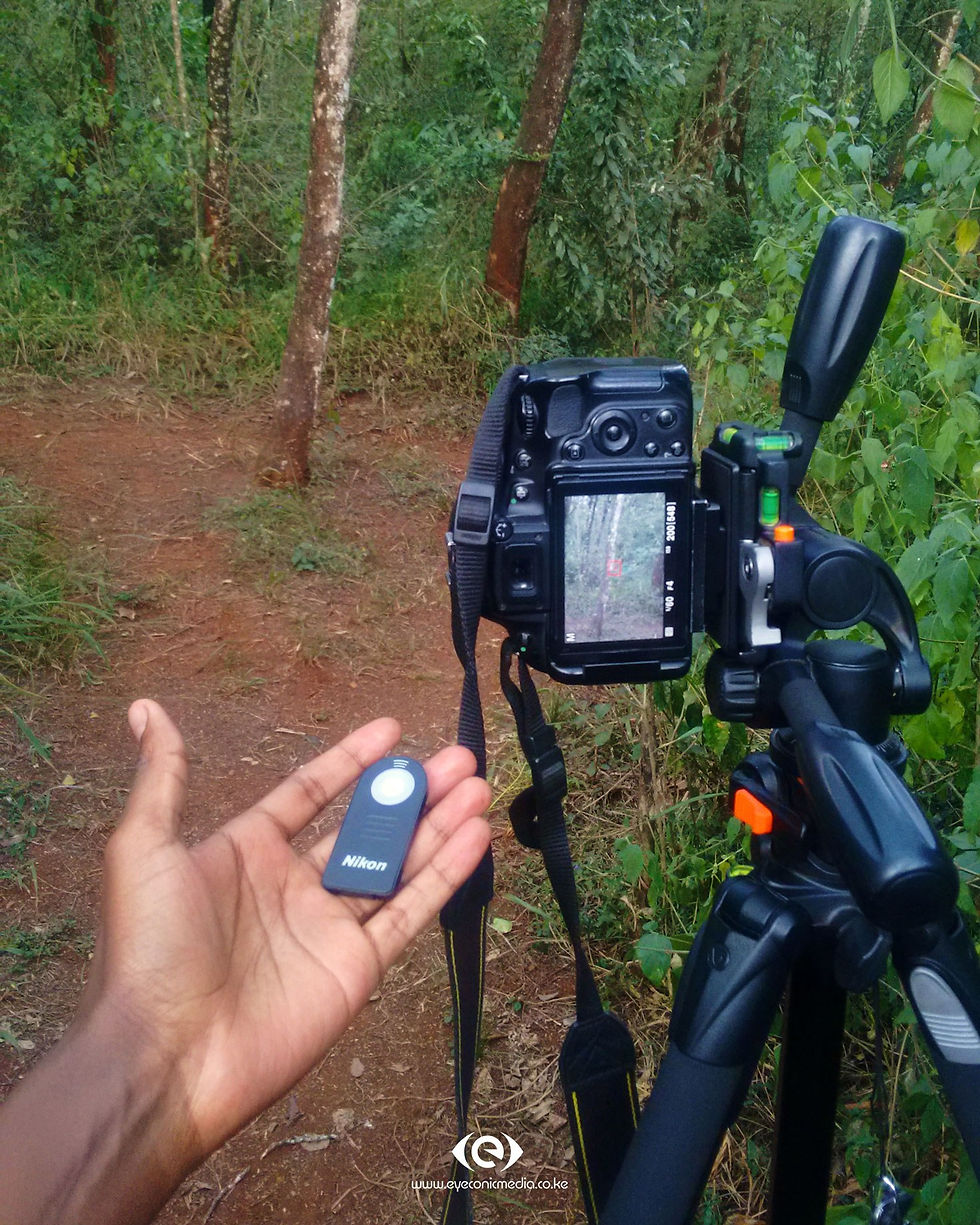
equipment set up in the foreground, main subject in the background
TIP 1: Choose a time period where the light remains uniform – either when the sun is out or when it’s behind the clouds. If the light changes between the shots, you’ll have a hard time matching the different shots during post processing.
4. Take a shot of the tree without the ‘arms’.
(Like in No. 2 above)
5. Position your left ‘arms’ as desired and take the shots using your right hand. The easiest way to do this is by using a remote trigger or the self timer on your camera.
Repeat for the opposite side.
![MTS04 - PP Screenshot [RAW 01-04]](https://static.wixstatic.com/media/1aed06_6a9a4bc9189d4a998063f1b23eb3f492~mv2.jpg/v1/fill/w_980,h_332,al_c,q_80,usm_0.66_1.00_0.01,enc_auto/1aed06_6a9a4bc9189d4a998063f1b23eb3f492~mv2.jpg)
sequence of the ‘arms shots’ to used for the blending of the composition
TIP 2: For each of the sides, make sure that only your arms are visible in the shot. This will make blending easier on Photoshop as you’ll have less cleaning up to do.
6. Load the images into Adobe Lightroom, make the desired basic adjustments, and then open the set as layers in Photoshop.
7. Place the Base Image as the layer at the bottom of the set.
Place a black mask on each of the arms images and using the paint brush tool (set to white), brush out to reveal just where the arm is positioned.
Since the base image is at the bottom and is aligned to the arms images, don’t worry about being precise in your brush strokes as it reveals the same elements in all the layers.
Repeat this step for all the arms images.
![MTS04 - PP Screenshot [Masking 01-04]](https://static.wixstatic.com/media/1aed06_9e43b08f9beb428193733f07b6a2c4fb~mv2.jpg/v1/fill/w_980,h_332,al_c,q_80,usm_0.66_1.00_0.01,enc_auto/1aed06_9e43b08f9beb428193733f07b6a2c4fb~mv2.jpg)
masking the arms into the base image
![MTS04 - PP Screenshot [Blend 01-04]](https://static.wixstatic.com/media/1aed06_1a1f6ec4af13415a9487a7aae9b83789~mv2.jpg/v1/fill/w_980,h_332,al_c,q_80,usm_0.66_1.00_0.01,enc_auto/1aed06_1a1f6ec4af13415a9487a7aae9b83789~mv2.jpg)
sequence showing the blending results
NB: If you have no idea what masks are, there are countless tutorials on YouTube dedicated to the subject, like this one. I’d suggest you have a look at them after this.
8. After revealing all the arms, merge the images into one layer. Use Ctrl+Shift+Alt+E (PC) or Ctrl+Shift+Alt+E (Mac).
9. Edit to taste.


I used the Photoshop Filter Collection Nik Collection. Download it for free from Google, though they’ve recently halted further development of the suite, but it still works fine.
10. Export your piece of art and share with the world.
![MTS04---Hands-[Final]](https://static.wixstatic.com/media/1aed06_5d7ac25bf3874c038b3adef0205df5e3~mv2.jpg/v1/fill/w_980,h_1478,al_c,q_85,usm_0.66_1.00_0.01,enc_auto/1aed06_5d7ac25bf3874c038b3adef0205df5e3~mv2.jpg)
Final Image
Experiment with different compositions, subjects, locations and lighting conditions. It takes a bit of time getting to know your way around the entire process but when you get used to it, the hardest part becomes finding different compositions and locations.

show-me-your-hands – tree hugger
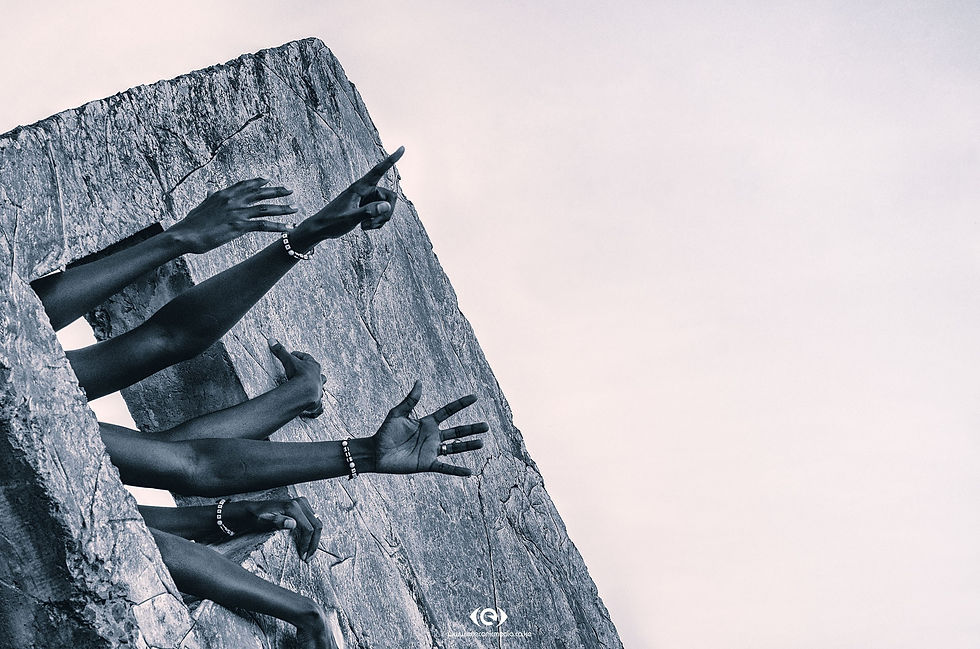
show-me-your-hands – reaching out
If you don’t get it right the first few times, keep trying. And, if you have some questions, do ask. I ready to help.
Otherwise, go forth and shoot.
As always, forget not to have fun while at it.
Comments